Hi everyone, Josh Haroldson here! Welcome to the very first Friday Photo Fiesta! 5 Photos on Friday? Josh’s Photo Editing Email to be Named Later???
Ok, obviously the name’s still a work in progress, but that’s why I’m seriously thankful you’re along for the ride. I’ve taught a lot of people informally about editing (like my wife who is this week’s guest photographer), but since this email is brand new your feedback will play a huge part in helping me to make this insanely valuable for you.
Ultimately I want to make sure that each week you learn something about photo editing or get inspired to try something new.
So, after you’re done reading this, can you please let me know what you want to learn about or if there is a photographer you’d like to see featured (you..?)? I promise I’ll read every single one. It would mean a lot to me to get your feedback! – Josh
This Week’s Edits – October 14, 2016
Quickly, before I get to the photos I want to give you a quick reminder of what to expect:
- Once a week (Fridays?) you’ll get an email from me with 5 photos
- 4 of the photos will be from me and 1 will be from a guest photographer.
- Each photo will have a before (straight out of the camera) and after (final edited version).
- I’ll list out the major edits made to the photo so you can recreate the look yourself!
Ready? Let’s go!
Apps Used This Week:
VSCO (iOS, Android), Instagram (iOS, Android), Adobe Photoshop Fix (iOS Only)
#1:
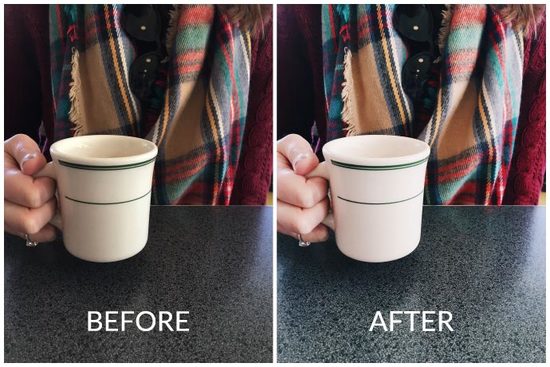
Camera: iPhone 6S
Location: Hubbard Avenue Diner, Middleton, WI
Software: VSCO / Instagram
Click here to see the post.
EDITS
VSCO:
- Preset C6 +7
- Exposure +3
- Contrast +2
Instagram:
- Brightness +10
- Contrast +25
- Horizontal Perspective: +2.5
NOTES
I took this photo while Stasia and I were having brunch at Hubbard Avenue Diner in Middleton, WI (blueberry pancakes…a treat we don’t often indulge in). The thing I love about this photo is that to me it is the quintessential snapshot. Just my phone and the natural light. But, you can see how the edit brought this from just a little too dark to a more accurate representation of the feeling in the room which was bright, happy, and full of life.
#2:
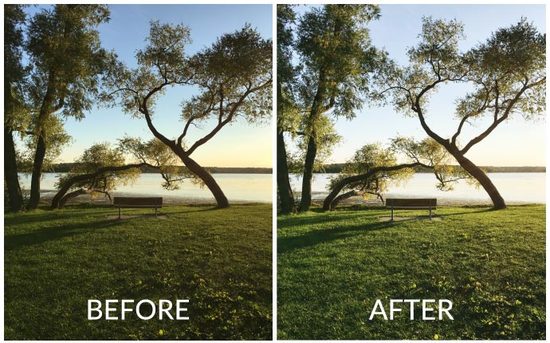
Camera: iPhone 6S
Location: Henry Vilas Beach, Madison, WI
Software: VSCO / Instagram
Click here to see the post.
EDITS
VSCO:
- Preset E6 +3
- Exposure +2
- Contrast +2
- Clarity +1
- Cropped slightly and straightened
NOTES
Golden Hour. As always, when you have such great light not much needed to be done to this photo which is why I so lightly applied the filter here. However, while getting better each iteration, the iPhone isn’t the best at capturing dynamic range (roughly the variation between the amount of light and dark that can be captured in the same photo). So, I need to bring up the exposure a little in order to not have the foreground be too dark. But, when you increase exposure that can wash out the dark areas. So, typically whenever I increase the exposure, I also add a little bit of contrast to balance out the image and add back in some dynamic range.
#3:
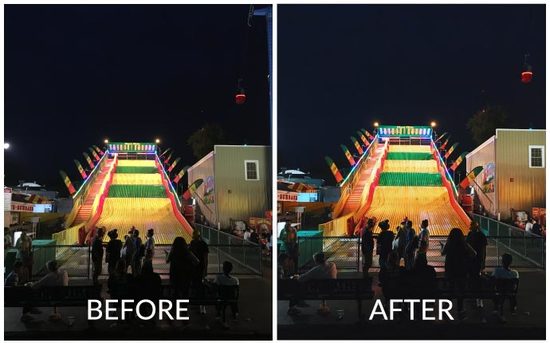
Camera: iPhone 6S
Location: 2016 Minnesota State Fair, St. Paul, MN
Software: VSCO / Instagram
Click here to see the post.
EDITS
VSCO:
- Preset C8 +10
- Exposure +2
- Highlights Save +1
- Shadows Save +1
- Contrast +1
- Clarity +1
- Cropped, straightened, vertical perspective changed
NOTES
Editing night photos taken on an iPhone gets pretty tricky. The darker areas can tend to have a lot of noise if you get too agressive with your filter (that tends to lighten shadows) or by adding in exposure. In this case I used VSCO C8 because it tends to darken the image and give everything a nice dark / saturated tone which fits perfectly with the neon lights. Clarity also helps to add a little bit of sharpness to the image without making it look grainy.
#4:
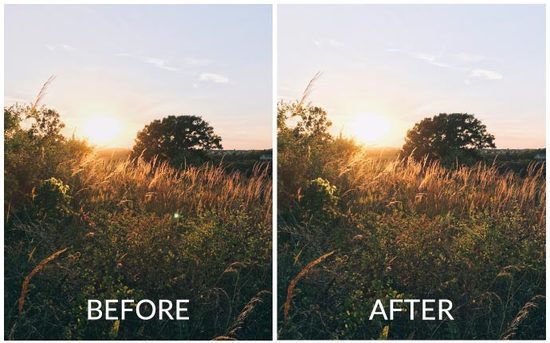
Camera: iPhone 6S
Location: Raymond Ridge Park, Madison, WI
Software: VSCO / Photoshop Fix / Instagram
Click here to see the post.
EDITS
VSCO:
- Preset E6 +9
- Slight crop
Adobe Photoshop Fix:
- Removed light artifact (aka bright green spot)
NOTES
Once again Golden Hour comes through. Sometimes great light does almost all the work for you. In this case I still wanted to use a subtle filter to lightly lower the saturation and brighten the image for Instagram. I find that Instagram often slightly darkens my images when I upload so often I’ll add a little extra brightness before hitting share. The real star of this edit however is my favorite spot removal tool, Adobe Photoshop Fix. This thing honestly works better than my desktop version of Photoshop / Lightroom for spot removal. It is that good.
#5: Guest Photographer @stasiaharoldson
About Stasia Haroldson:
For this first week, I had to include my wife Stasia. She’s pretty new to photography and editing, but in a couple of short months she’s come a long way! It has been really exciting to watch her learn and last weekend I was especially proud when The Everygirl re-grammed the picture she’s sharing today!

Camera: iPhone 6S
Location: Our Home
Software: VSCO
Click here to see the post on Instagram
EDITS
VSCO:
- Preset C2 +6
- Temperature -1
- Sharpen +6
NOTES
Whenever I see pictures I am drawn to, I always try to take note of what it is I like about them. The common themes are that they are always crisp and bright. For this photo, I had some great natural light and really great colors, but I wanted it to be even more bright and striking to someone looking at it, and I wanted it to feel like they were sitting in the same spot I was when I took it. – Stasia
So that’s it for the first edition! Don’t forget to let me know if you have any feedback, questions, or suggestions by replying to this email!
I’ll read every single one!
Until next Friday…have a great weekend!
-Josh, @joshharoldson
